
Getting Started with Amanzi#
To ease collaboration and make testing more effective, we maintain installations of Amanzi on a variety of systems at the participating labs. If you aren’t interested in building Amanzi on your own system, and you would really like to get started quickly with the Akuna Platform, please inquire about getting an account on one of the systems that ASCEM supports.
Downloading#
Amanzi is an open-source project that is distributed under a BSD license. To download a tarball of the source, go to the Amanzi downloads page and follow the instructions.
Installing#
For modern Unix/Linux systems including Mac OSX, building and installing Amanzi is relatively straightforward process. The build process, which is launched by a single script - bootstrap.sh - automatically downloads and builds the required Third Party Libraries (TPLs), and then builds Amanzi and links it to the TPLs that it build. The script can be found in the root directory of the Amanzi directory tree. However, care must be taken to ensure that the requirements for the compilers, message passing interface (MPI) libraries, and the build tool CMake are satisfied. Details for the requirements, optional components, and build scripts are provide in
Input Files#
Amanzi input takes the form of an eXtensible Markup Language
( XML )
file with the extension *.xml.
Although any text editor may be used to create or edit the contents of the file,
an editor that provides XML syntax-highlighting improves readability
and is helpful toward identifying syntax errors. This feature is
provided in most editors, including, emacs, vi, and gedit.
The following image is an example of XML syntax-highlighting in the
Notepad++ editor
for Microsoft Windows:
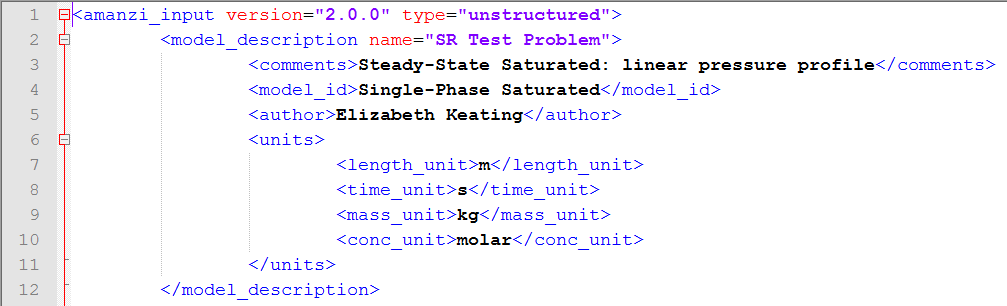
Although not required by the XML standard or Amanzi, indentation using tabs and/or spaces is commonly used to indicate the hierarchy of nested XML elements and improve readibility. Tabs (8 character width) are used in the above XML snippet. .. Amanzi uses a custom XML schema to check the input file for inconsistencies in structure with .. respect to the configuration expected based on the Amanzi user guide. Any input errors of this nature are flagged for the user to correct, and Amanzi does not attempt a numerical flow and/or transport simulation. Amanzi XML element and attribute names are mnemonic, but the user will need to consult the user guide for important details on file structure and data entry syntax.
Running Amanzi#
After building Amanzi, the executable amanzi is installed in the specified
<prefix>/bin/ directory. Amanzi can be run in serial or parallel, but it
always possible to run Amanzi using the parallel job submission script and
simply set the number of processor cores to 1 for a serial run. On most
desktop, laptop and small cluster systems, the mpirun or mpiexec command
is used
mpirun -n NN <prefix>/bin/amanzi --xml_file=input.xml
In the future Amanzi will use a custom XML schema to check the input file for i nconsistencies in structure with respect to the configuration expected based on the Amanzi user guide. The new command line will be
mpirun -n NN <prefix>/bin/amanzi --xml_file=input.xml --xml_schema=<prefix>/bin/amanzi.xsd
The input file is often in the directory that you are running the command
in, while the Amanzi executable and schema generally require full paths.
To discover learn about the options that the amanzi executable supports
you can use the --help option:
mpirun -n 1 <prefix>/bin/amanzi --help
gives:
Usage: amanzi [options]
  options:
    --help                          Prints this help message
    --pause-for-debugging           Pauses for user input to allow attaching a debugger
    --echo-command-line             Echo the command-line but continue as normal
    --xml_file              string  XML options file
                                   (default: --xml_file="")
    --xml_schema            string  XML Schema File
                                    (default: --xml_schema="")
    --print_version         bool    Print version number and exit.
    --no_print_version              (default: --no_print_version)
    --print_tplversions     bool    Print version numbers of third party libraries and exit.
    --no_print_tplversions          (default: --no_print_tplversions)
    --print_all             bool    Print all pre-run information.
    --no_print_all                  (default: --no_print_all)
    --print_paths           bool    Print paths of the xml input file and the xml schema file.
    --no_print_paths                (default: --no_print_paths)
Note that you can inquire about the version of Amanzi you are currently running (--print_version),
as well as the versions of the TPLs that it was linked with (--print_tplversions).
Output Files#
Amanzi can produce a variety of output files during a run, and the actual output is controlled by the sections of the input file. The most common output files are the observation, visualization and checkpoint files.
The checkpoint files are used to restart a computation that was terminated before the simulation end time. This could be due to a limited resource allocation or because several new runs might be launched with a common steady-state. Thus, checkpoints include all the information about the current state of the system to restart the computation (fields, parameters, etc.).
Visualization files for simulations that ran with the unstructured grid framework, use the eXtensible Data Model Format (XDMF) in conjunction with the Hierarchical Data Format version 5 (HDF5). This combination provides a standard set of meta data and data containers to enable the use of several open-source visualiztion tools. In particular, the meta data approach allows visualization tools to load a single file, e.g.,
plot_data.VisIt.xmf
where plot was provided as the base_name for visualization in the output file. This single file contains include elements that point to the xmf files that are created at each specified time- or cycle-step.
Observation files include a sequence of outputs taken over a selected region. The sequence of times is usually specified with a time macro, and the region is often a point.
Visualizing Output#
The data that may be selected for observation output, and that is included in the visualization files is
Volumetric water content [volume water / bulk volume]
Aqueous saturation [volume water / volume pore space]
Aqueous pressure [Pa]
Hydraulic head [m]
Drawdown [m]
Water table [m]
SOLUTE aqueous concentration [moles of solute SOLUTE / volume water in MKS] (name formed by string concatenation, given the definitions in “Phase Definition” section)
SOLUTE volumetric flow rate [mol/s]
X-, Y-, Z- aqueous volumetric flux [m/s]
Material ID
Volumetric water content [-]
Gravimetric water content [volumetric water content * water density / bulk density, in kg/m^3]
Hydraulic Head [ (aqueous pressure - atmospheric pressure)/(rho * gravity) + z ]
Aqueous mass flow rate [kg/s] (must use integral functional in the observation)
Aqueous volumetric flow rate [m^3/s (must use integral functional in the observation)
Fracture aqueous volumetric flow rate [m^3/s] (must use integral functional in the observation)
Tools such as VisIt and ParaView can read the xmf files visualization files directly. Instructions on installing and using VisIt and ParaView are included in the appendix.